Importing Data into Premisys


Data import introduction
Loading a PremiSys database with cardholder data pulled from another source saves time and increases accuracy. The best approach is determined by system needs.
IDenticard Technical Support offers data importing as a fee-for-service, ideal for challenging import scenarios or for technicians new to data importing in PremiSys. Once completing this tutorial, you should understand how to plan and execute most data imports.
Import difficulty levels:
Simple
- Block add (first name, middle initial, last name, card properties), or
- One-time import from .csv file into PremiSys.Cardholders base table fields
Typical
Source database contains an ideal MigrationID field* (i.e. key field) for:
- One-time import into multiple tables in the PremiSys database, or
- Prepare to set up scheduled task for repeated imports
*MigrationID is a field that contains a unique value that is populated for every record in the source database and in the destination database (PremiSys). It allows the import utility to identify existing records, and update rather than duplicate them. Most imports will require a MigrationID field.
Advanced
- Import from multiple tables in the source database, and generate access cards, or
- Import from multiple source databases, or
- Prepare for repeated imports, but don't have an ideal MigrationID
DO NOT import or block add without backing up your database first!
There is no "undo" button. But PremiSys comes with an easy-to-use, application-level backup and restore utility. Find it under "Tools" > "Backup/Restore." Back up the system just before. If you aren't happy with the results, use the Restore option to revert the system back. Alternately, if you are familiar with SQL, backup the .idfs and .mdfs. files: CardHolders.mdf, CardHolders_log.LDF, PremiSys.mdf, PremiSys_log.LDF.
Video - how to use the backup & restore utility
Determine approach
What are the customer's specific needs?
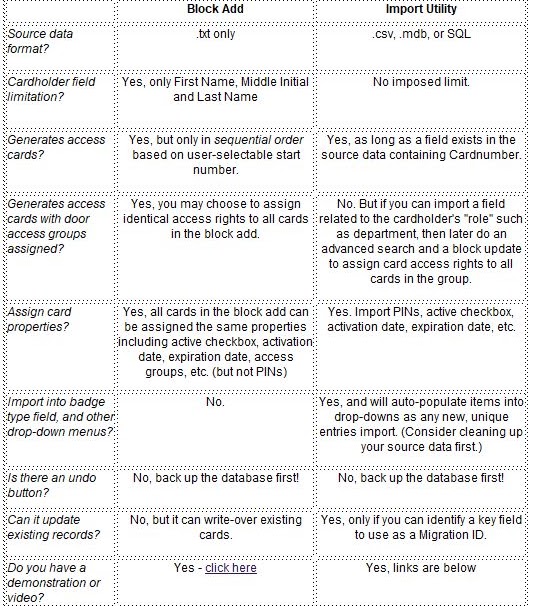
Will this be a one-time import, or repeated in the future? Do any existing records match any records in the data to import? If so, identify and use a migration ID (a Key Field) to prevent duplicating records. Do you want to generate access cards for the new cardholders, too? Both the import utility and block add support this, with key differences:
Comparison between Block Add and the Import Utility
Preparation
Determine which fields you need in PremiSys
Confirm the PremiSys database contains all the fields you need. Go to Tools > Data > Data Management. Click on "CardHolders" and select "Open." Below is the base table called "CardHolders" in the PremiSys database. This table is not editable, but it contains most of the fields you'll import into. Pay close attention to Data Type.
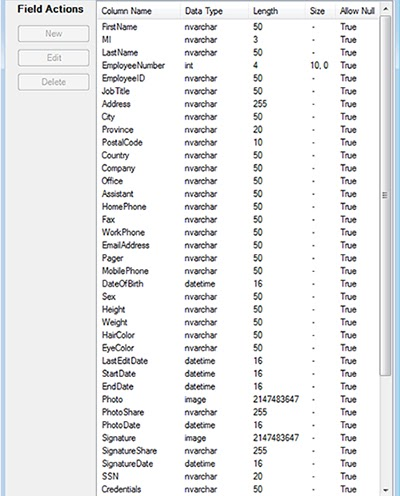
"Base Table" in PremiSys (Cardholders.Cardholders)
Avoid errors on import by confirming incoming data is compatible with the destination field type. For example if importing any letters or special characters into "EmployeeNumber," the import will fail because an "int" data type field may only store integers (numbers). However an int data CAN import into a nvarchar field without issues. Also, notice the default "MI" field above. It's length is only three characters; to import a full middle name, you'll need a custom field.
If you don't see the custom fields you need, like "ParkingSpace," create them. New, free-typable fields and checkboxes are created in CardholdersExt table. New drop-down menus are created as tables, but there is no need to populate them with items as the importer will do that.
Video - how to create custom fields
Video - how to create new drop-down menus
Be prepared for some warnings during the import, as it notifies you when it spots field types and lengths that don't match between the source data and destination database. Reported warnings don't indicate a problem, but reported errors do.
Prepare your source data
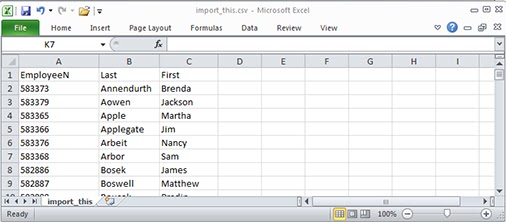
To import from an .xls file, first do a "save as" comma delimited CSV file. Be sure to enter field names in the first row. If you will run the same import in the future, choose a permanent location and file name. Always inspect your source data, "Good data in = good data out."
Execution
Have a written field mapping document
A wizard will step us through creating the field mapping definition file, including field mapping e and the location and name of the source data and destination database. It's a good idea to have a written document to refer to during the setup wizard. Below, see examples for a simple import, a typical import and an advanced import.
Simple Data Import
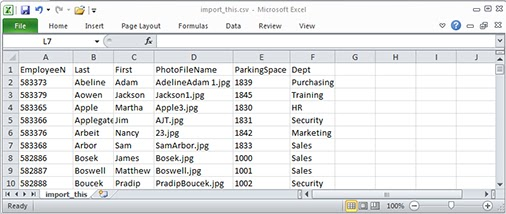
Simple Import - Step 1
This will be a one-time import. All the fields needed already exist in the PremiSys.Cardholders table and a .csv file is prepared with column headers and data to import.
Simple Import - Step 2
Using a chart format, layout the names of which fields in the source data will go into which fields/tables in PremiSys.
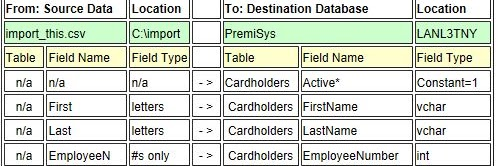
*The Cardholders.Active field requires a 1 entered for each record. The wizard allows us to specify a constant value to populate into this field for every imported record.
Simple Import - Step 3
Back up the database, launch the definition setup wizard, save the definition file and execute the importer.
Typical Data Import
Typical Import - Step 1
Normally a one-time import, the destination fields are located across two different tables in the PremiSys database. We have a .csv file prepared with column headers and the data to import.
Typical Import - Step 2
Using a chart format, layout the names of which fields in the source data will go into which fields/tables in PremiSys.
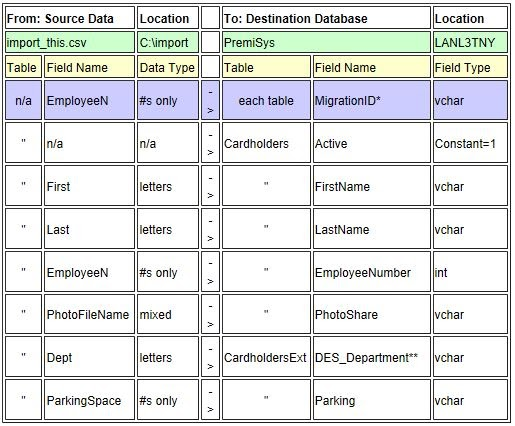
Notes:
* Importing into two tables in PremiSys requires using a MigrationID field. Employee number is a good choice because every record has one and each is unique. If you don't have an obvious choice for migrationID, create an autosequenced field in your .csv file.
** DES_ before a file name indicates relation to a field in another table, you'll normally see this for drop-down menus and access card properties.
Typical Import - Step 3
Back up the database, launch the definition setup wizard, save the definition file and execute the importer.
Advanced Data Import
Advanced Import - Step 1
When the source database is .MDB or SQL, be sure to familiarize yourself with the source fields and tables. If importing access card properties, pay close attention to data types.
Advanced Import - Step 2
Using a chart format, layout the names of which fields in the source data will go into which fields/tables in PremiSys.
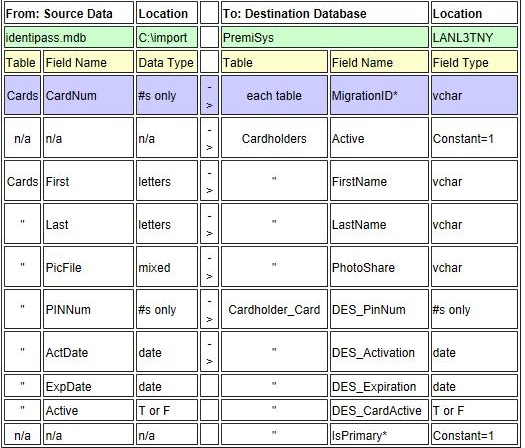
*cards will not save if the IsPrimary field does not contain 1.
Advanced Import - Step 3
Back up the database, launch the definition setup wizard, save the definition file and execute the importer.
Example 1 - Click-through demo, no audio
Example 2 - Video - Advanced Import
Note: source data shown is an identipass.mdf file, for illustrative purposes only. CardNum is a Key field in IDentiPASS, making it an ideal MigrationID field. The data importer can not assign access groups to cards imported into PremiSys. (You can do a block update afterwards.)
After the Data Import
Inspect your results
If data did not import as expected, use the restore utility to revert your system back the point at which you created your backup. If corrections are needed to the definition file, you must begin the definition file wizard over again (see Step 3). Advanced users such as IDenticard Technical Support may be able to edit your definition .xml file manually, however data importing is fee-for-service.
Video - how to use the backup & restore utility
Optional: set up a scheduled task
The .xml file you created with the import utility can be executed manually, or set up to run as a scheduled task. Large enterprise customers generally want PremiSys cardholder data to update automatically from a third-party database. MigrationID is very important when planning for repeated imports.
Video - setting up scheduled data imports
For practice away from your live system
To practice with the data importer away from a live system, install and use PremiSys in Try Mode on a stand-alone PC. For assistance, contact IDenticard Technical Support.