How to Add Time Zones in PremiSys

Time Zones are used for:
- Door access for cardholders.
- Unlock visitor doors automatically.
- Limit trigger/procedures by time (such as sending email notifications only in the evening).
Best practices:
- Name time zones intuitively, enter purpose in name as a prefix, i.e.
• Cards – 24/7 access
• Cards – Basic employee access
• Doors – Visitor hours unlock time
• Trigger/Procedure – Evening email notification
- Time zones for doors should be separate from time zones used for cards
- Create visitor door time zones specific to each physical location in larger systems.
Time Zones contain six intervals. Multiple intervals are necessary if you need:
• A time zone that crosses midnight (third shift)
• Multiple start and end times in a single day (split shifts)
• Different hours on different days of the week (staggered)
• An alternate schedule on certain dates, like closing at Noon on a 1/2 day holiday
Adding a Time Zone:
- Right-click Time Zone(s). A shortcut menu of options appears.
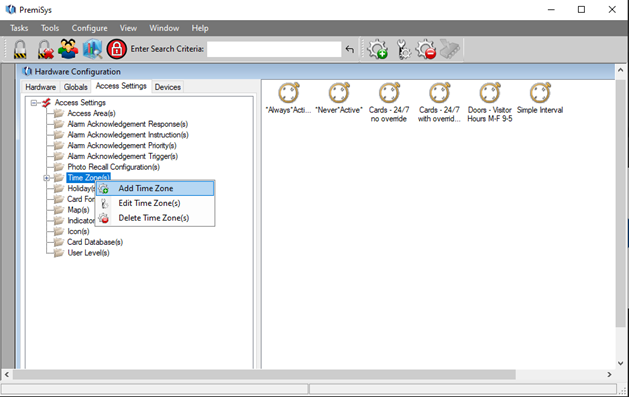
- Select "Add Time Zone." The Time Zone window opens.
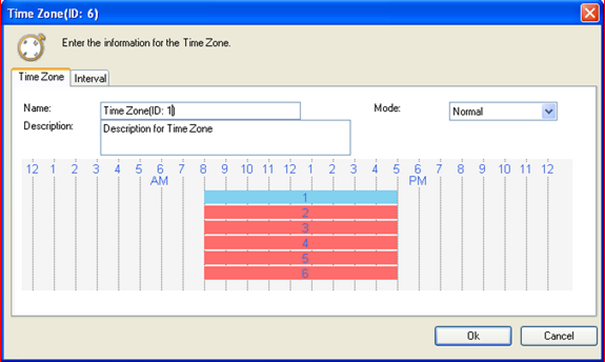
- Enter a short, descriptive name for the time zone in the Name field.
Optional: Enter a more detailed description of the time zone in the Description field.
- Click the arrow in the Mode drop-down field to select a mode.
· Normal - Scans the intervals in the time zone and applies the one that meets current criteria.
· Always Active - All intervals are ignored and the time zone is active 24 hours per day, 7 days per week.
· Never Active - All intervals are ignored and the time zone is inactive 24 hours per day, 7 days per week.
Note: You must select "Normal" if you want to apply interval and holiday settings to the time zone.
- Select the Interval tab and based on the type of interval you are creating; follow those steps below.
Simple interval:
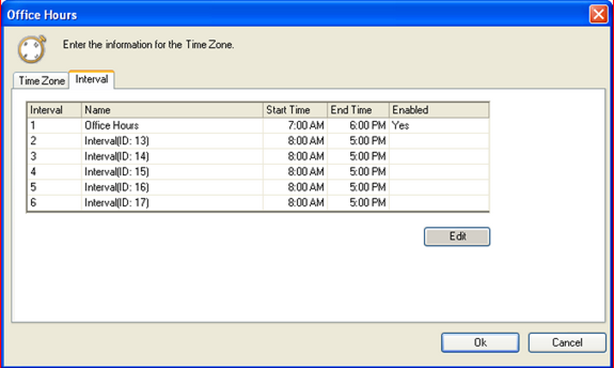
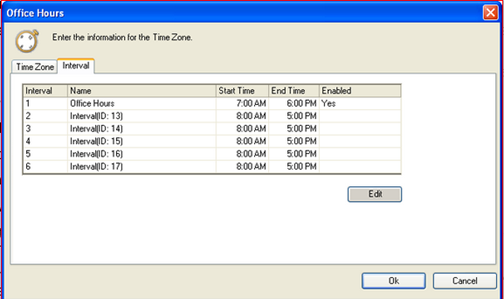
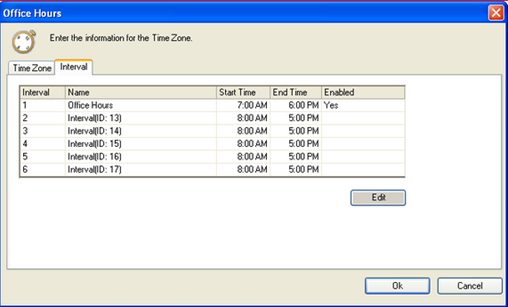
- Click the "Interval" tab to display the 6 default intervals of the time zone. The first interval displays "Yes" in the Enabled column.
- Click the first interval and then click the "Edit" button.
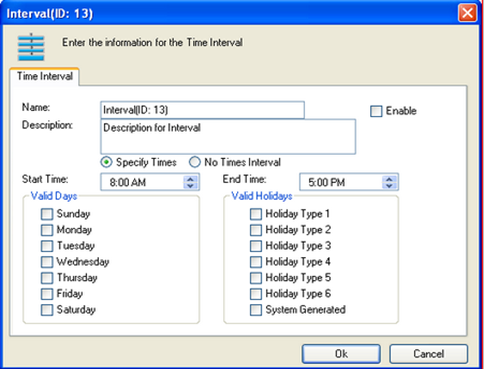
Enter a short, descriptive name for the interval in the Name field.

- Enter the full (HH:MM AM/PM) start time and end time that you need for the interval in the relevant fields. All start times begin at: 00 seconds of any minute; all end times end at: 59 seconds of any minute.
Example: Enter a 7:00 AM start time and a 6:00 PM end time.
- Select the check boxes corresponding to the days of the week that you need the interval to be active.
Example: Select the check boxes for Monday, Tuesday, Wednesday, Thursday and Friday.

- Confirm the "Enable" check box is selected, so that the interval is active.
- Click "Ok" to save your interval settings and to close the Interval window.
Assign an interval that "Crosses Midnight":
- Click the "Interval" tab to open a page where the 6 default intervals of the time zone appear in a table. The first interval displays "Yes" in the Enabled column.
- Click the first interval and then click the "Edit" button.
Enter a short, descriptive name for the interval in the Name field.
- Enter the full (HH:MM AM/PM) start time that you need for the interval in the Start Time field.
Enter "11:59 PM" in the End Time field so that the interval ends at midnight.
All start times begin at: 00 seconds of any minute; all end times end at: 59 seconds of any minute.
Example: Enter a 10:00 PM start time and a 11:59 PM end time.
- Select the check boxes corresponding to the days of the week on which you need the interval to start.
Example: Select the check boxes for Sunday, Monday, Tuesday, Wednesday and Thursday.
- Click "OK" to to save your interval settings.
- Click the second interval and then click the "Edit" button.
Enter a short, descriptive name for the second interval in the Name field.
- Enter "12:00 AM" in the Start Time field so that the interval begins at midnight. Enter the full (HH:MM AM/PM) end time that you need for the interval in the End Time field.
Example: Enter a 12:00 AM start time and a 6:00 AM end time.
- Select the check boxes corresponding to the days of the week on which you need the interval to end.
Example: Select the check boxes for Monday, Tuesday, Wednesday, Thursday and Friday.
- Select the "Enable" check box to make the interval active.
- Click "Ok" to save your interval settings and to close the Interval window.
Assigning Holiday Types to the Intervals:
To enable a holiday to take effect during a time zone, you must configure an interval that defines the active hours of the holiday and assign the appropriate holiday type to this interval. For instance, an all-day holiday has no active hours; an afternoon-off holiday has active hours in the morning. Holidays override any day-of-the-week settings, so you do not need to select any days for a holiday interval.
An all-day holiday should have no active time in its interval. When the holiday occurs, doors do not grant access to cards, front-door relays do not unlock the doors, lobby-door input points are not masked and so on.
Assign an all-day holiday type to an interval:
- Click the "Interval" tab of your current time zone.
- Click the next available (unused) interval and then click the "Edit" button.
Enter a short, descriptive name for the interval in the Name field, such as "24-hr. Holiday Interval."
- Select the "No Times Interval" option. This option defines the interval as having no active time during the holiday.
- Select the holiday type check box corresponding to your all-day holiday type, for example, "Holiday Type 1." You may select more than one holiday type per interval, for example "Holiday Type 1" and "System Generated."
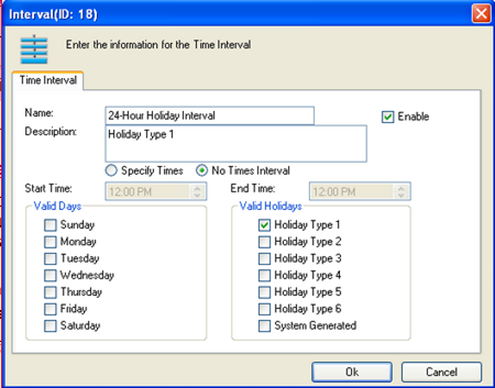
- Click "Ok" to save your interval settings.
- Click "Ok" to save the configuration and close the Time Zone window. The new time zone appears as an icon in the right-hand pane of the Hardware Configuration window.
Assign a partial-day holiday type to an interval:
The interval for a partial-day holiday must be active for the part of the day that is not the holiday. For example, if a facility opens at 7:00 AM but is to close at noon, the interval should have a start time of 7:00 AM and an end time of 12:00 PM. The time zone interval is active from 7 to 12; however, beginning at noon, all system features enabled by this time zone are disabled.
- Click the next unused interval in the time zone and then click the "Edit" button.
- Enter a short, descriptive name for the interval in the Name field, such as "PM-Off Holiday Interval."
- Enter the full (HH:MM AM/PM) start time and end time that you need for the interval in the relevant fields. Note: Verify that your start time is not earlier than any other interval start time in the time zone.
Example: Enter a 7:00 AM start time and a 12:00 PM end time.
- Select the holiday type check box that corresponds to your all-day holiday type, for example "Holiday Type 2." You may select more than one holiday type per interval.
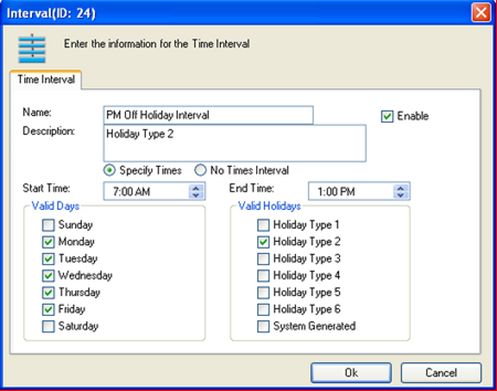
- Click "Ok" to save your interval settings and to close the Interval window.
- Click "Ok" to save the configuration and close the Time Zone window. The new time zone appears as an icon in the right-hand pane of the Hardware Configuration window.